

Preview and test a newsletter
Before you send a newsletter, check it in the newsletter wizard’s Preview step. It shows the newsletter as one recipient at a time will see it, with their merge tags filled in and only the sections meant for them, and lets you send a test email.
Use both: the preview shows what each recipient gets, and a test email shows how the newsletter really looks in Outlook or on a phone. Send a test before every newsletter that goes to more than a few people.
Preview the newsletter
Section titled “Preview the newsletter”In the newsletter wizard, go to the Preview step.
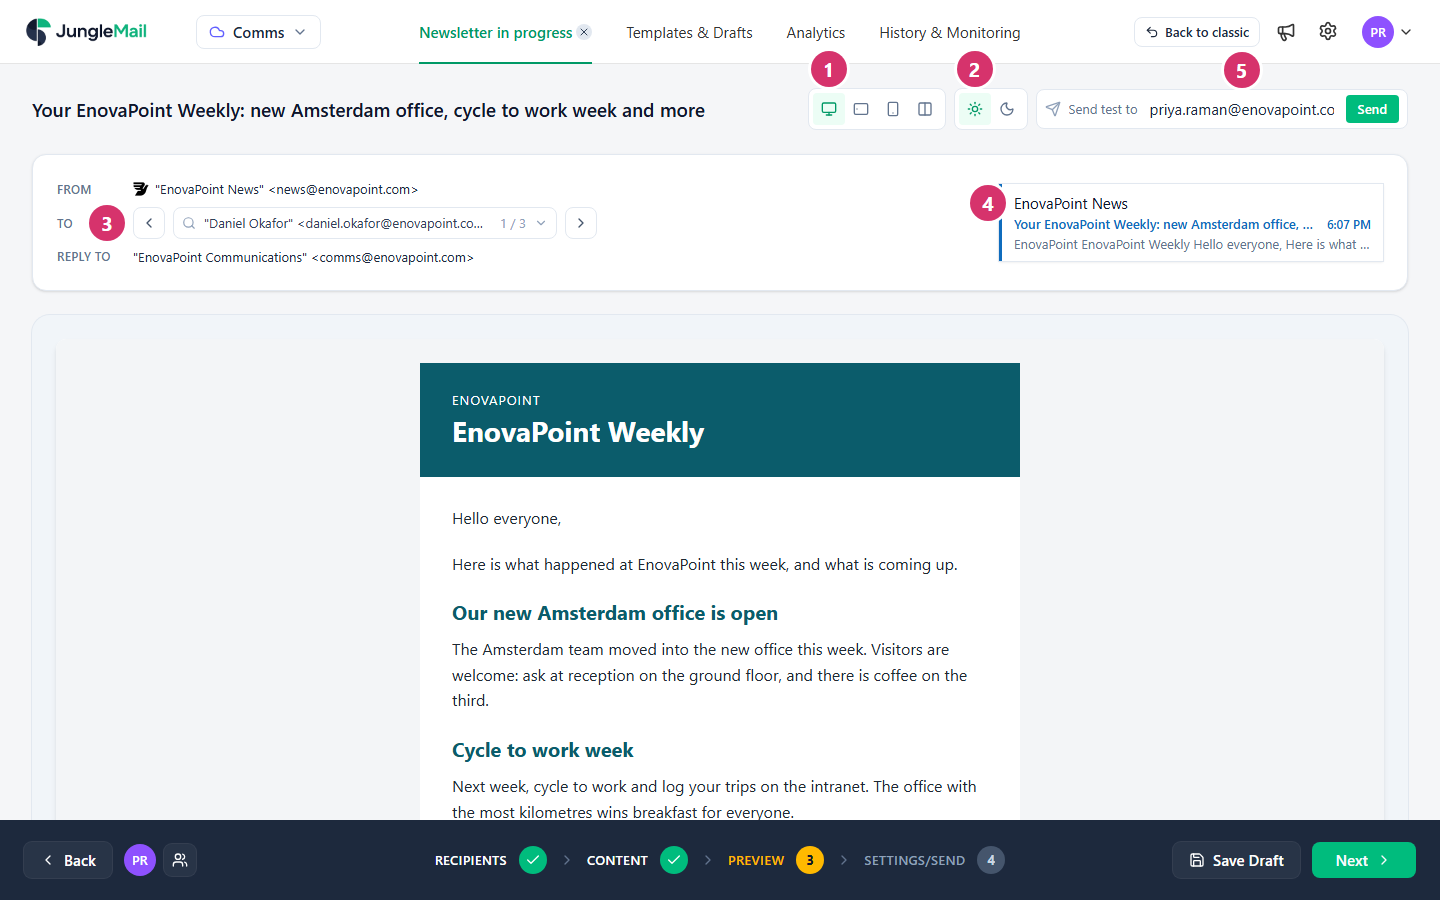
- Choose the screen to preview on: Desktop, Tablet, Mobile, or Desktop and mobile side by side. Check Mobile as well as Desktop: your newsletters’ reports show under Reading Devices what share of their opens are on a phone (Read a newsletter report).
- Choose Light mode preview or Dark mode preview. Dark mode differs between email programs and devices, so treat it as an approximation. Check that your logo and text stay readable on the dark background.
- Go through the recipients with the arrows, or select the recipient’s address and search for another. The newsletter changes with each recipient: their name and other merge tags, and the sections shown to some recipients only. If a recipient won’t get the newsletter, the preview says why: This recipient will be skipped. Look at recipients who differ: one for each section shown to some recipients only, and one whose details are incomplete, such as someone without a first name in the directory, to see what their merge tags show.
- Check the inbox preview: the sender’s name, the subject and the preview text as an inbox lists them.
- Send a test email: see below.
Above the recipient, From shows the sending address; below it, Reply to shows where replies go.
If something is missing, such as the subject, the sending account or the recipients, the preview says so in its place, with Fix it. to go to the step where you add it. Pre-flight checks, above the email, lists problems in the content; select Fix. beside one to go where you fix it.
Send a test email
Section titled “Send a test email”A test email shows the newsletter in a real email program, which can show it slightly differently from the preview.
- In Send test to, at the top right, check the address. Your own is filled in. To send to others too, separate up to 10 addresses with commas; that needs the Send test emails permission, without which you can send tests only to yourself.
- Select Send. JungleMail confirms the addresses it sent the test to.
The test email is made for the recipient shown in the preview, with their merge tags and sections, so you see what that person will get. To see another version, such as the one with the London section, select a London recipient before you send the test.
Each address a test goes to uses one of the emails your plan includes for the billing period, but doesn’t count as a unique recipient, so send tests to the few people who check the newsletter rather than to a whole team. When no emails are left, JungleMail doesn’t send test emails.
- Open the test where your readers read. Look at it in Outlook and in the mail app on your phone. Outlook may hold back its pictures, as it does for your readers (Images don’t load, or open rates look low).
- Try Gmail when the email is long or goes outside your organization. Gmail cuts off large emails, often hiding the footer with the unsubscribe link, and the email builder warns you as the email nears that size (Keep your email under Gmail’s clipping limit).
- Check one person by address. Select the recipient’s address above the preview and search for theirs: No recipient matches that. means they aren’t among the recipients (Some recipients are missing).
- Mark a trial send as a test newsletter. When you send the whole newsletter to a few colleagues to try it out, turn on Mark as a test newsletter in the Settings/Send step, so that it stays out of your results (Delivery, tracking and report options).