

Manage a JungleMail site
In JungleMail 365, every team that sends newsletters works in its own JungleMail site, such as Comms for EnovaPoint’s internal communications team. Each site has its own sending accounts, connections, subscribers, users and settings, and its administrator sets them up on the Site Management pages. Select Settings, the cog at the top right, to open them.
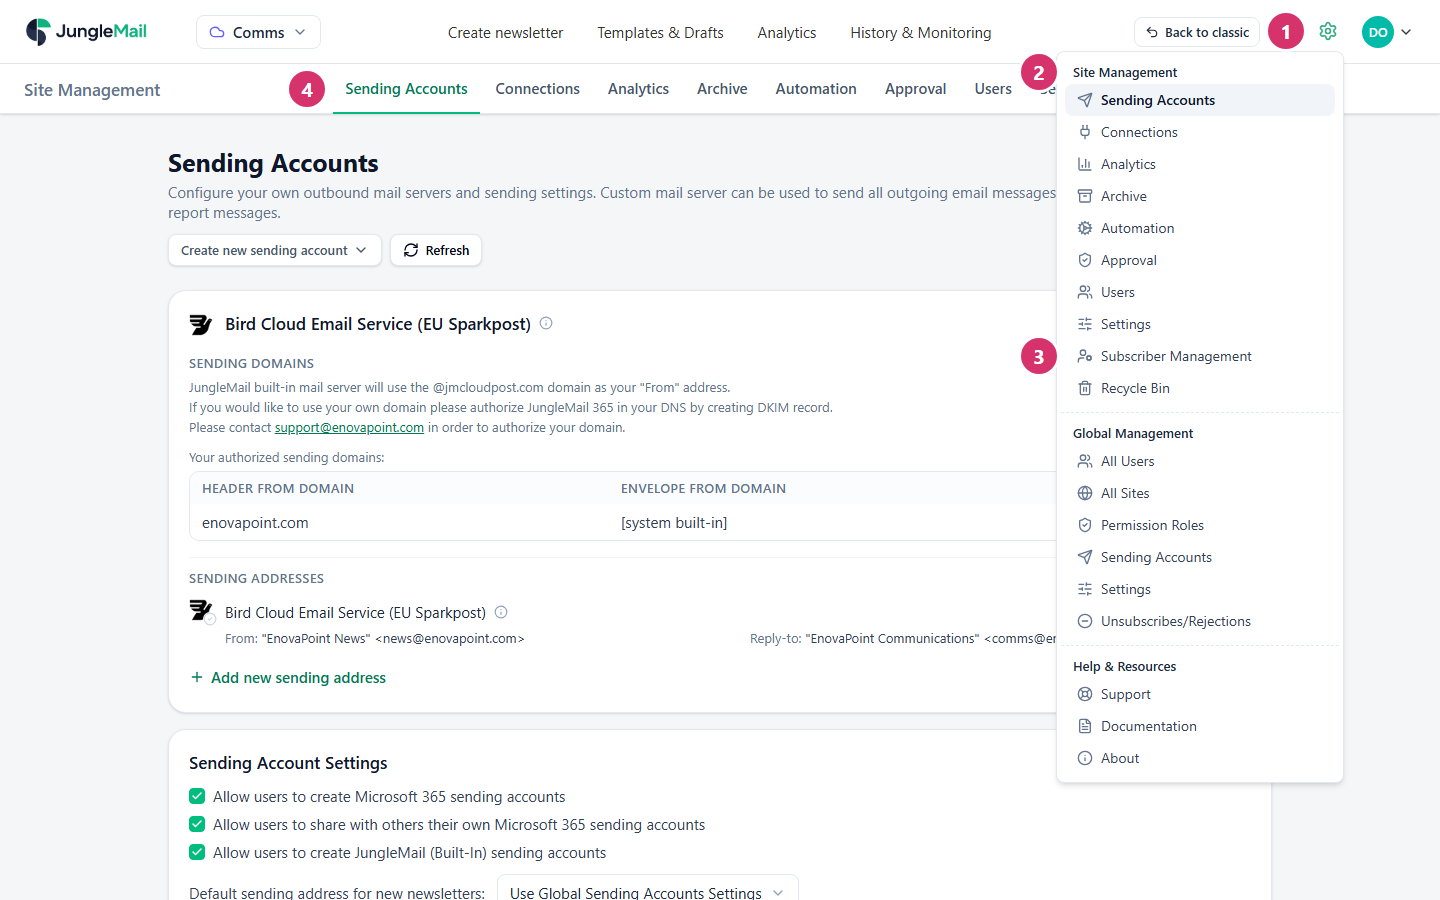
- Settings opens the menu.
- Site Management: the pages for the site you are working in, chosen at the top left. Global Management, further down, is for the whole organization, and only a global administrator can open it.
- Subscriber Management and Recycle Bin open from this menu only.
- The Site Management tabs, from Sending Accounts on, for moving between its pages.
You need the Administrator role on the site to see every page. A permission role can also give access to some of them, one page at a time (Permissions). Setting up a site for the first time? Follow Set up JungleMail for your organization.
Where to start
Section titled “Where to start”New to looking after a site? Do these three first, in this order; the rest can wait until editors ask for it.
- Add a sending account. Nobody on the site can send until it has one. For internal newsletters to up to 2,000 people,
use a Microsoft 365 sending account on a shared mailbox, such as
news@enovapoint.com, authorized with an account that will stay (Choose a sending account type). Then make it the default, so that new newsletters start with it (Decide who can use and create sending accounts). - Let the right people in, with the least access they need. Editor for those who write and send, Administrator for one or two people who look after the site, and the team’s group rather than each person where you can (Manage site users).
- Connect where your recipients are. Microsoft Entra ID for Microsoft 365 groups, SharePoint for lists and SharePoint content, Microsoft Exchange for dynamic distribution groups (Connections).
Before the first newsletter to everyone, send one to a few colleagues and check that it arrives in their inbox, as your readers will see it. Approval, analytics segments and the archive are worth setting up once the site is in use and you know what it needs.
Sending accounts
Section titled “Sending accounts”Sending Accounts: the mail servers and addresses that newsletters are sent from. Nobody on the site can send until it has at least one.
- Choose a sending account type
- Add a Microsoft 365 sending account
- Add a JungleMail mail server sending account
- Add an SMTP server sending account
- Add and manage sending addresses
- Decide who can use and create sending accounts
Connections
Section titled “Connections”Connections: Microsoft Entra ID, Microsoft Exchange, SharePoint and Dynamics 365 CRM. They let editors send to groups, SharePoint lists and CRM contacts, and add SharePoint content to newsletters.
- Connections
- Connect Microsoft Entra ID
- Connect Microsoft Exchange
- Connect SharePoint
- Connect Dynamics 365 CRM
Subscribers
Section titled “Subscribers”Subscriber Management: the people who subscribed to the site’s newsletters and the topics they chose, and the addresses that unsubscribed or were rejected.
- Subscribers
- Manage JungleMail subscribers
- Build subscription forms and fields
- Customize subscriber emails
- Use SharePoint subscribers
- Manage unsubscribes and rejections
Site features
Section titled “Site features”Analytics, Archive, Automation and Approval: what the site’s reports collect, where sent newsletters are kept in SharePoint, which Power Automate flows newsletters start, and who approves newsletters before they are sent. The results themselves are under Analytics in the top menu (Analytics and reports).
- Set up analytics segments and locations
- Archive newsletters to SharePoint
- Trigger Power Automate flows
- Set up newsletter approval
Site settings
Section titled “Site settings”Users, the seven tabs of Settings, and the Recycle Bin. A site’s Settings either follow the global settings, which a global administrator sets for every site, or are the site’s own.