

Personalize with merge tags
A merge tag stands for a detail of the recipient, such as their first name. When the newsletter is sent, each recipient gets their own value in its place: “Hello Daniel,” for Daniel, “Hello Ingrid,” for Ingrid. The details come from where the recipients come from, for example their Microsoft 365 profile or the columns of a SharePoint list. Use a merge tag for a word or two that differ per recipient, such as a greeting or an office; for a whole story that only some recipients should read, show a section to them instead (Show a section to some recipients only).
Before you begin
Section titled “Before you begin”- Choose the recipients first, in the Recipients step (Choose recipients). The builder offers the details of those recipients; until they are chosen, it has no recipient merge tags to offer. For recipients typed as email addresses, for example, it offers First name, JungleMail Recipient Address, JungleMail Recipient Name and Newsletter Author. For a Microsoft 365 group it adds each member’s details from Microsoft Entra ID, such as Department, Office and Job title, and for a SharePoint list the list’s columns (Merge tags).
Insert a merge tag
Section titled “Insert a merge tag”In the Content step, select a Title, Text or Button block, place the cursor where the detail should go,
and select Merge tags in the toolbar. You can also type { to choose from a short list.
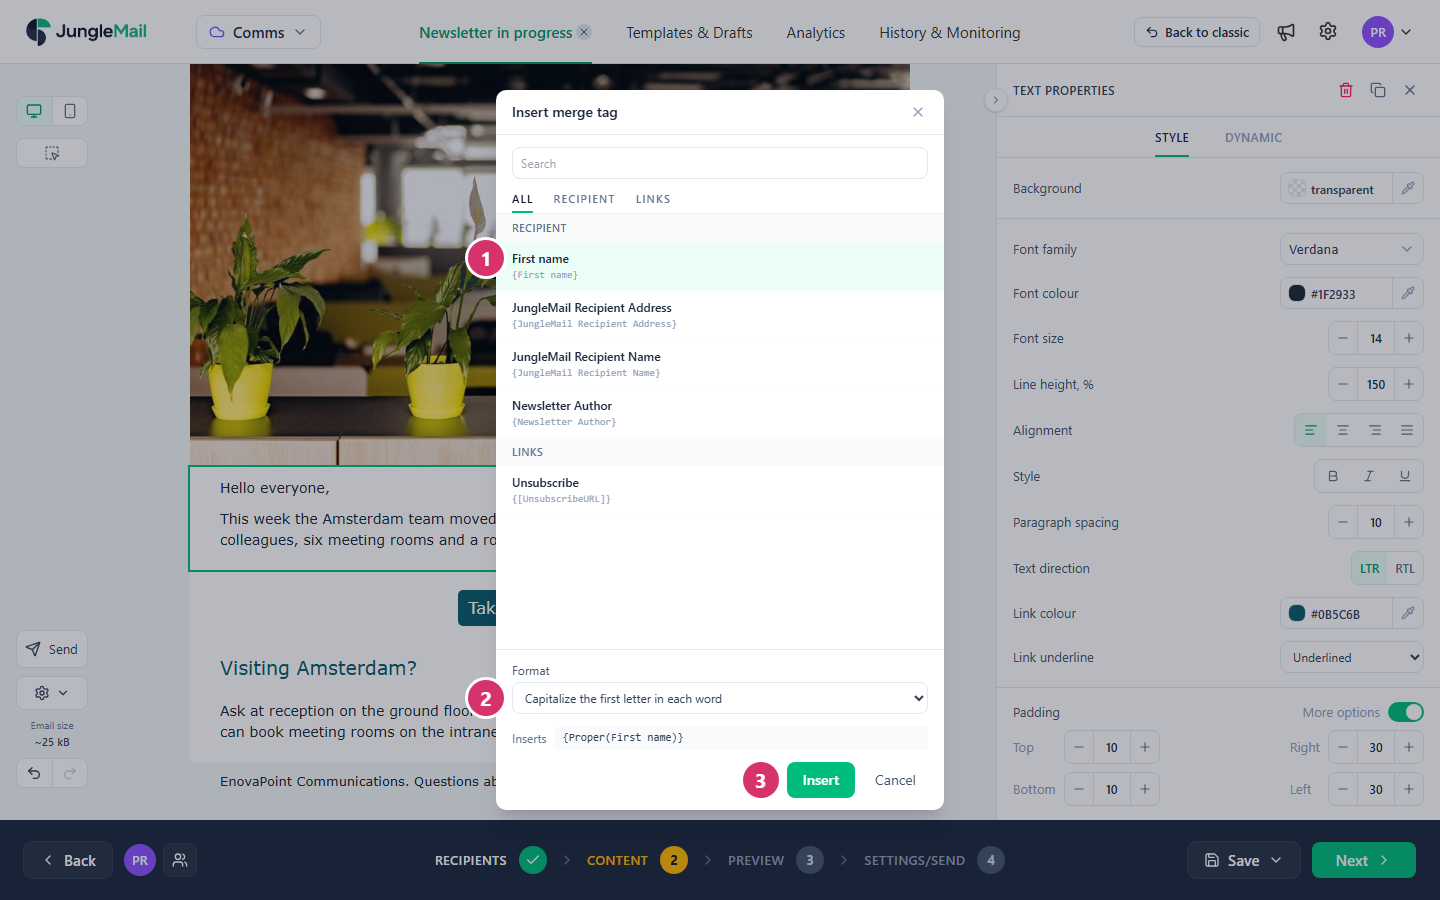
- In Insert merge tag, choose the tag. Recipient lists the recipients’ details and Links the links, such as Unsubscribe; the search box finds a tag by name.
- If you like, choose a Format, such as Capitalize the first letter in each word for a name or Full date
for a date. Inserts shows what will be written into the email, such as
{Proper(First name)}. For names from a SharePoint list or a file, where people type their own, capitalizing keeps “ingrid” from reaching Ingrid. - Select Insert.
The tag shows on the email as a chip with its name. Hover over it to see what it stands for, and select it to rename it, change its Formula or Remove it.
Use merge tags elsewhere in the email
Section titled “Use merge tags elsewhere in the email”- Links, picture addresses and alternate text: select Merge tags (
{}) at the end of a field such as Link, Image URL or Alternate text in the block’s properties, so that each recipient gets a link or a picture of their own. - The subject and preview text: in the Recipients step, select Quick actions beside the field, then Placeholders & Formulas (Write the subject and preview text).
- Content from SharePoint has merge tags of its own, on the Dynamic section and Dynamic block tabs of the same dialog (Add SharePoint content).
Check the result
Section titled “Check the result”Go to the Preview step and choose a recipient: the preview shows the email with that person’s details (Preview and test a newsletter).
- Give a merge tag a fallback where details may be missing. A recipient without a value gets nothing in its place,
so a greeting can reach someone added by email address alone as “Hello ,”. Type
{IfEmpty(First name; "colleague")}instead, and they get “Hello colleague,” (Formulas and functions). - Preview someone whose details are incomplete. Not everyone has an Office or a Job title in the directory. In the Preview step, look at such a recipient as well as a complete one, to see what your merge tags show them.
- Check the merge tags again when you change the recipients. Each recipient source has its own merge tags, and
one the new source doesn’t have stays in the email as you typed it:
{[Start Date]}from a SharePoint list, for example, means nothing to a Microsoft 365 group (Merge tags). - Use a formula for a sentence that depends on a detail. Typed in a Text block,
{If(Office = "London"; "See you in the atrium"; "Join online")}gives London readers a different line from everyone else, without a section for each office (Formulas and functions).