

Find and compare newsletter results
The Newsletter Analytics tab lists the newsletters sent from your JungleMail 365 site, newest first, each with its results. You can narrow the list by name, category and date, and switch the figures between counts and rates to compare newsletters of different sizes. Compare a newsletter with others of its kind sent to similar people: an IT notice and a town hall invitation are read for different reasons.
Find newsletters and compare them
Section titled “Find newsletters and compare them”Select Analytics in the top menu. The list opens on the Newsletter Analytics tab.
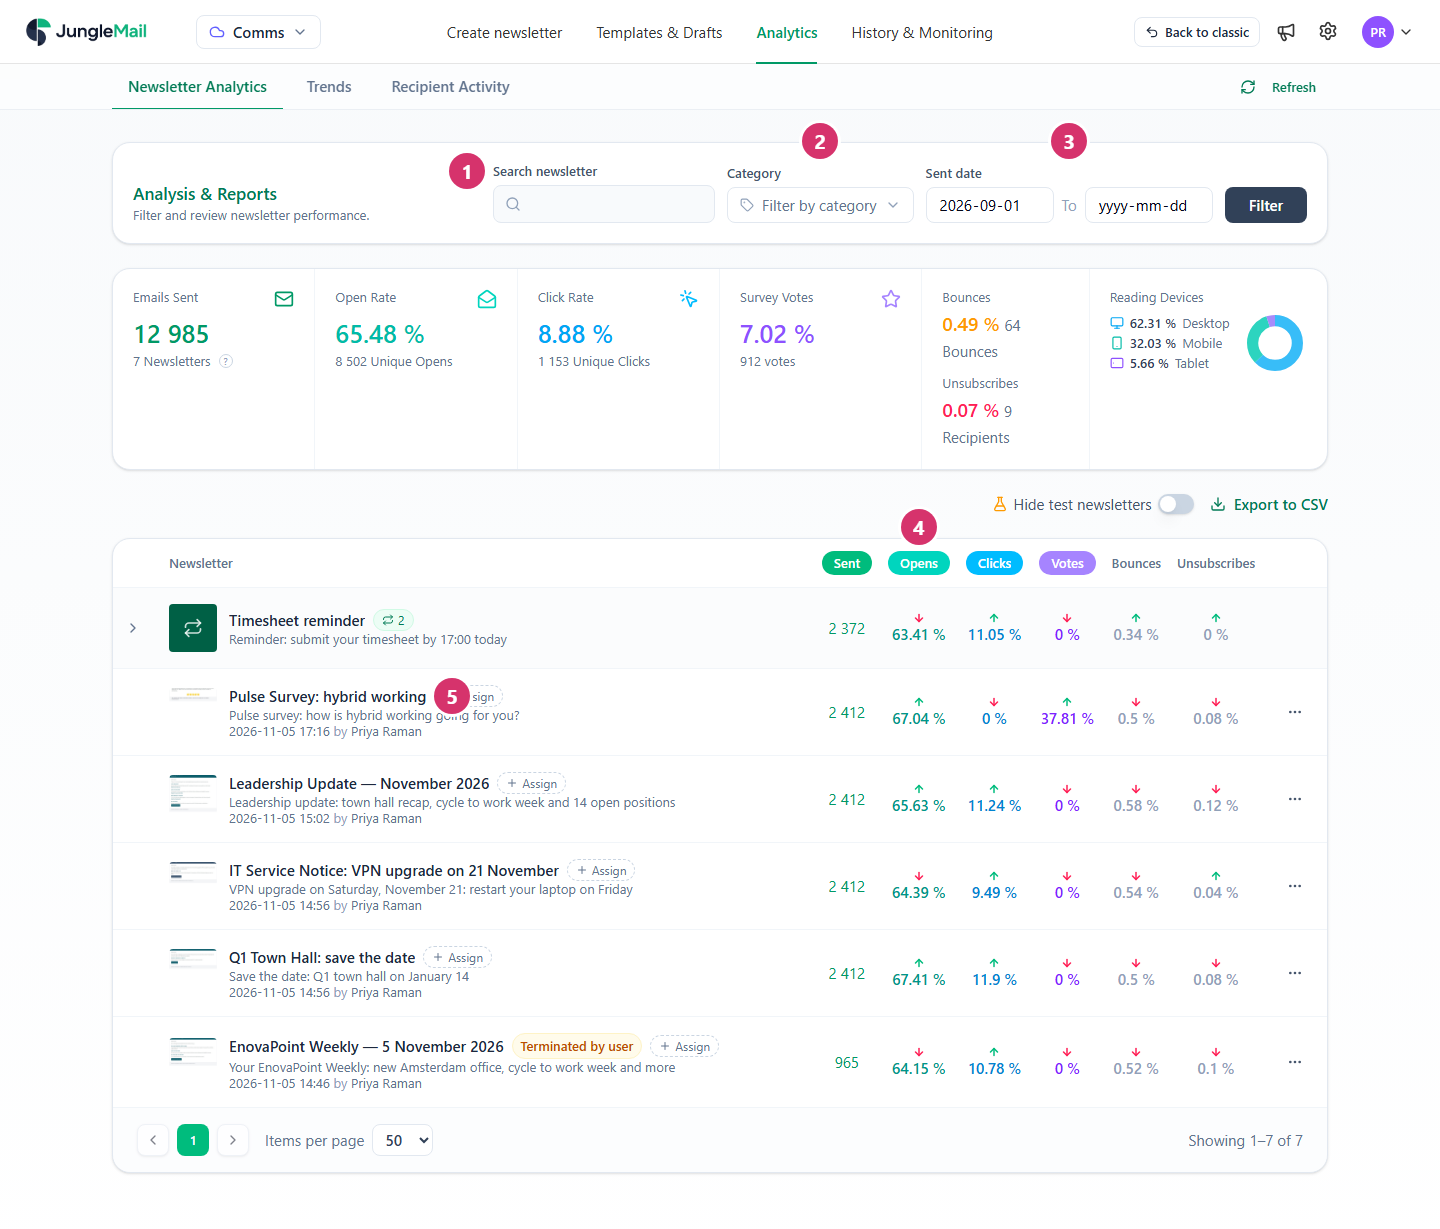
- To find a newsletter, type part of its name, subject or sending address in Search newsletter and press Enter.
- To list one category of newsletters, choose it in Category. Do this before you read the arrows below, so that each newsletter is compared with its own kind.
- To change the period, choose the first and the last day in Sent date, then select Filter. Without a last day, the list runs up to today. When you first open Analytics, it starts on the first day of the month two months ago.
- Select any figure in the table to switch every row between counts and rates. Select a figure again to switch back. Compare in rates: 40 opens of a team update and 1,583 of a company-wide newsletter say nothing until each is a share of its own emails sent.
- Select a newsletter’s name to open its full report (Read a newsletter report).
Read the comparison
Section titled “Read the comparison”Each figure except Sent has an arrow that compares the newsletter with all the newsletters listed on the page:
- Opens, Clicks and Votes: a green arrow up when the newsletter’s rate is at least the rate of the whole list, a red arrow down when it is lower.
- Bounces and Unsubscribes: a green arrow up when the newsletter’s rate is no higher than the list’s, a red arrow down when it is higher.
The totals above the table, such as Emails Sent and Open Rate, cover the newsletters on the current page only. To compare more newsletters at once, show more on a page with the page size below the table.
Recurring and multilingual newsletters
Section titled “Recurring and multilingual newsletters”- A recurring newsletter is one row with the number of times it was sent beside its name. Select the arrow at the start of the row to list each send with its own results.
- A newsletter in several languages has an arrow too. Select it to list a row per language, and select a language to open the report for that language.
Leave out test newsletters
Section titled “Leave out test newsletters”Newsletters sent to try something out lower your averages. Turn on Hide test newsletters above the table to leave out every newsletter marked as a test; JungleMail remembers the choice.
To mark a newsletter as a test after sending it, select More actions (⋯) at the end of its row, then Mark as Test. Unmark as Test undoes it. The same menu also opens a preview, copies the newsletter, loads its recipients or content into a new one, changes its title in the reports with Edit Title, and deletes it. The menu is there if your role lets you edit newsletters.
- Give every newsletter a category and a name with its date when you create it. Category can then put each newsletter beside its own kind, such as every Leadership Update, and Search newsletter finds an issue by its date (Create a newsletter). For one already sent, Edit Title in More actions changes its name in the reports.
- Leave the newest newsletters out of a comparison. A newsletter sent today is still collecting opens, so its red arrows may only mean that it is new. Read it again once its opens have leveled off.
- Don’t read a zero in Bounces as perfect delivery. Newsletters sent through a Microsoft 365 sending account report no bounces; their undeliverable emails go back to the sending mailbox (Bounces and rejections).